
Attack Dribble Multiple Actions
This post will cover the attack dribble with 2 or more actions. Because we haven’t taught any more of the offense, the best way to teach multiple actions is to have 3 or more players on the court. When we start to teach other parts of the offense, we will able to string multiple actions together with two players. Since attacking offensive players haven’t been taught what to do after they pass, we will have them step off the floor after their attack.
The previous post covered 2 players 1 action building blocks. Adding the 3rd, 4th, or 5th offensive players to these single action building blocks is pretty straightforward. You can even add other defenders. In theory, there is nothing wrong with having 10 players on the court and executing one action. However, your possessions will be very short and most of the players on the floor won’t be involved in the action. This will probably hurt the intensity of your practice. As a result, we recommend that when 3 or more players are on the court that you always execute 2 or more actions.
A. 3 offensive players 2 actions
This next step is the same as the 2 on 0 blocks except there is a 3rd offensive player. Previously, the attacker only had one receiver as an option. This is the first time that the attacker will have more than one receiver. The attacker must have awareness on every drive where receivers will be located. The attacker must make a clearly defined attack while the receivers learn to react habitually by rotating in the appropriate direction. Both receivers must be ready to receive a pass.
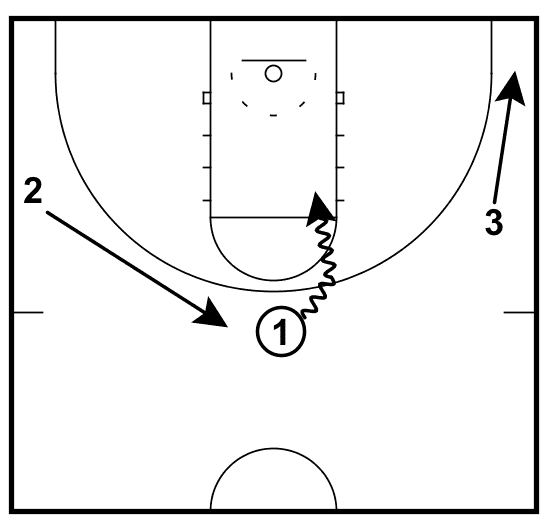
This is also the first opportunity to execute the second action with a second reaction. After the first receiver catches the pass, the initial ball handler steps off the floor. Player 3 can attack immediately or they can fake and then drive. It’s important for player 2 to react to the attack and not anticipate it. This is a good way to repeat the Circle Movement reaction. The same coaching considerations listed in the previous post apply here. Receivers must know that they are always an option for an attacker and must be in the proper position on every drive whether they receive the pass or not. Even though only one layer and at most two actions are being taught at this time, players must be in proper position in order to maintain proper spacing for the next action. This 3 player building block is especially good for teams with 12 players who only have 2 baskets.
B. 3 offensive players 1 defender 2 actions
Coaches can now put a defender on any player and run the same drill as before. The defender must maintain the proper position based on the player with the ball and their defender. If the ball handler dribbles in their direction, the defender should “help” and now they are forced to close out and play 1 on 1. The other offensive players in the drill remain as outlets and rotate if the player with the ball attacks. The ball handler can now be taught shot selection in a 1 on 1 scenario. This block is similar to the 2 on 1 block above except defenders are added to both receivers. Defenders can play at varying levels of intensity depending on the emphasis. This will help attackers become comfortable with delivering passes to all receiver positions from all attacking positions against defenders. This block can be used to build from a defensive standpoint as well. It is recommended that other layers are added before players are allowed to play in any type of live scenario except for 1 on 1. Even in 1 on 1, there should be time, space or dribbling constraints. Just as in the 2 on 1 and 2 on 2 blocks above, once the ball handler passes, they are no longer in the play along with the person who was defending them. Any person with the ball who is being defended is forced to look to attack. We always want players to be threats.
C. 3 offensive players 2 defenders 2 actions
It’s the same as above with another defender. You can choose which offensive players are being defended. It all depends on what you’re trying to teach and emphasize. No matter what, you’re able to get repetitions in the individual skills and building the habits of Circle Movement.
D. 3 offensive players, 3 defenders 2 actions
This is very similar to building block C with an extra player. 1 on 1 defense, closeouts, help and recover and rebounding can all be taught from this building block. This building block can be turned into a number of different drills to teach a number of different skills. It’s up to the coach and the emphasis.
E. 4 offensive players 2 actions
This building block will let the ball handler see 3 of their teammates in motion at once. This building block may not require a lot of time for more advanced teams. It may still be a useful step in helping younger players build the complete picture. All 4 of these players must be perimeter players. They could be in 4 out or 5 out spots. Keep in mind placing them in a 4 out alignment completes the picture for this alignment. Congratulations!!!
F. 4 offensive players 1 to 4 defenders 2 or more actions
I think everyone is smart enough to figure this out by now. Right? This could be a whole blog post by itself. This is a great opportunity to teach help and recover. Depending on how you teach your rotations, the person who was guarding the ball initially might not be responsible for defending the ball after help comes. This can be very useful in teaching the person who was beaten initially the importance of playing through failure.
G. 5 offensive players 1 to 5 defenders, 1 to 4 actions
This completes the picture. Remember to keep everyone on the perimeter. No post players allowed yet.