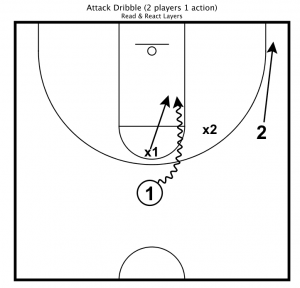
The Breakdown for Attack Dribble
This post starts the breakdown for Attack Dribble Layer starting with 2 on 0 player building blocks and build up to 5 on 5. Individual skill development is critical. This breakdown will provide numerous to incorporate skill development as team concepts are built.
One big question that some might ask: “What do I tell players when they pass?” For now, we are not going to tell them anything, because we haven’t covered what to do when you pass. For some building blocks, I’m going to tell them to step off the court. In other situations, they might rebound. In any case, they won’t have any decision to make. We don’t want them to worry about that right now. We want them to focus on the Attack Dribble Layer. This becomes important in being able to practice back to back actions.
So for now, for any drill designed through any building block for this layer, the rule is if you make a pass, you (and your defender if one exists) step off the floor once you pass. When other layers are added, they will have “something to do.”
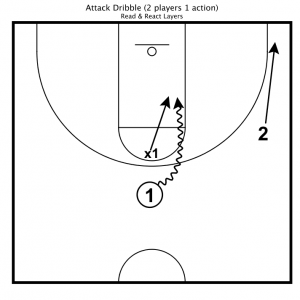
A. 2 offensive players 1 action
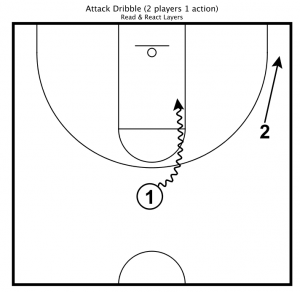
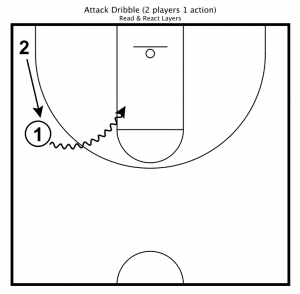
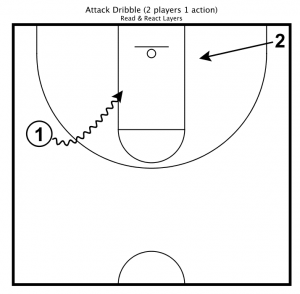
This building block is the most basic component for teaching this layer. Everything else will build off of this. Coaches will still want to conduct individual skill development drills first to teach the different fundamentals that make up the building block. However, this is the first time where players really learn how to play team offense.
Players start at two designated spots. The player with the ball performs an attack dribble. The player without the ball rotates aggressively in the appropriate direction to the next spot. Is it really that simple? Sure it is; except it’s not. I’ll discuss the different things that can go wrong shortly. Let’s finish the building block first.
The attacking player must make a decision on when the defense has committed to help on the attack. If they have their defender beaten and help doesn’t come, they should keep going. If the defense steps over to help, this means their teammate should be open and they should look to pass them the ball.
In designing the drill from the building block, coaches should consider some of the following details:
Which spots are we using?
There are plenty of combinations. Coaches should make sure players are comfortable attacking and rotating from all spots. Players should be adjacent to each other initially.
As they become more comfortable, the two players can be located on any two spots. This will help teach the ball handler to read help defenders from different positions and to make passes to players all over the floor.
Just remember, NO BASELINE DRIVES….yet.
What is the ball handler going to do?
- The ball handler can finish with a layup or a jump shot. The other player rotates. They must practice an aggressive rotation even if they aren’t going to get the ball.
- The ball handler takes 1 or 2 dribbles and kicks it out to the receiver who has rotated properly. The receiver shoots or attacks the basket. The initial ball handler is now out of the drill or maybe they are a rebounder.
- Initially predetermine the direction of the penetration. This is important for youth players who are new to the action. Eventually, though all ball handlers must be given the freedom to choose the direction of the drive.
- Ball handlers attack off the dribble as opposed to off the catch. The question then becomes when do the receivers rotate. Once the ball handler enters a scoring area? After the ball handler crosses the 3 point line?
10 Things that can go wrong
The ball handler…
-
- travels on the attack.
- gets the ball stolen before they attack.
- dribbles with the wrong hand (e.g. going left with their right hand).
- dribbles too deep before they kick it out.
- stares down their receiver instead of selling the attack.
- doesn’t get downhill.
- passes with the wrong hand.
- makes a bad pass.
- pivots incorrectly.
- doesn’t actually attack.
Or the receiver…..
-
- rotates the wrong way.
- doesn’t rotate at all.
- reacts late.
- isn’t aggressive in their rotation.
- isn’t ready to be a receiver.
- rotates but ruins spacing
- shoots a shot with a foot on the 3 point line.
- travels when they try to attack the basket.
- remains stationary when the attacker makes a scoring attempt.
- takes a bad shot.
There’s a lot that can go wrong in this simple 2 player building block. This also means that there is a lot you can teach out of this simple building block. Granted, a lot of these are basic fundamental skills but they will show up in other places as well. In any case, this is a great chance to teach, reinforce, and emphasize those skills in addition to learning the what happens when a player attacks the basket.
This is just the first block, but it’s such an important one. It is a great tool to drill all the offensive fundamentals associated with this layer as well as the team concept. The inability for players to execute the basic offensive fundamentals that make up this layer will lead to turnovers or bad shots. There are countless drills that can be created from this building block to teach any number of things. However, continuous repetition of this single building block for the purpose of improving offensive execution is ineffective since reactors are able to anticipate the initiator’s action. This is especially true at higher levels, but even youth teams will eventually need to be challenged more than this basic drill. So let’s add some defense.
B. 2 offensive players 1 defender on the ball 1 action
The only difference between this building block and the previous one is the addition of a defender. However, this one defender changes the dynamic of the drill.
We will have the defender start guarding the attacker. This can be live or not, but the receiver must still react. If the defender is a dummy defender, it is up to the coach to specify what happens. If the situation is live, the attacker should look to score first, but they must take good shots. This is a good way to teach shot selection for the attacker. Is the attacked passing up opportunities to score? Can the attacker when the defender has played good defense? Do you have players that can score 1 on 1 even if the defense is good?
The receiver must always rotate appropriately, even if they don’t receive a pass. The ball handler must be limited in the number of dribbles and/or space that they have to score. This might as well be called 1 on 1 with an outlet. However, there are a lot of offensive and defensive concepts that can be taught in this building block, not to mention the many different ways that the 1 on 1 situation can be created. Either way, why have players standing on the baseline watching two people play 1 on 1. Have them in spots on the court, practicing their reactions. Every repetition helps.
C. 2 offensive players 1 defender off the ball 1 action
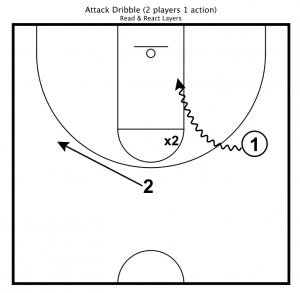
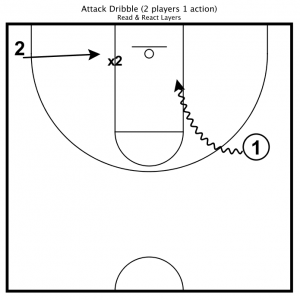
Now we will start teaching the ball handler player to read the help-side defense. Again this drill will depend on your defensive philosophy.
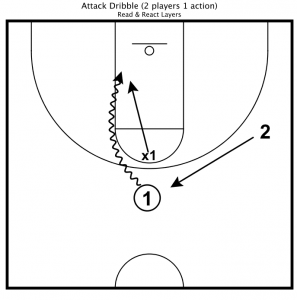
Notice that the diagrams have defensive players on them, but your philosophy will determine how the defensive players move. Place two offensive players in any two spots that you want. Then have a defender in help position. This defender can be defending a stationary coach or the offensive player without the ball. You can have the ball handler attack in a way that forces this defender to help or you can use this to teach help defenders when not to help and where their rotation will be when someone else helps.
This building block can be used to teach defense in a variety of situations as well as closeouts in these situations. Are you working on helping one pass away and recover? Maybe you are working on helping from 2 passes away? Are you working on not helping and teaching defenders to remain disciplined on their help rotations even when the ball is driven? Remember you’re teaching the offensive side of things at the same time.
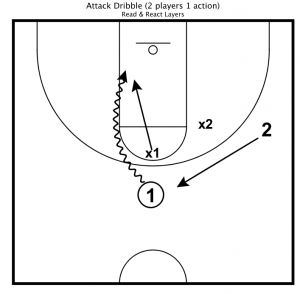
D. 2 offensive players 2 defenders 1 action
Next, we’ll add a second defender. Obviously, you’ll have one player with the ball and one player without the ball. These two
players can be in any two spots on the floor. The drawings show the offensive player going one way with the offensive player reacting appropriately. You can designate that the offensive player go a specific direction or you can let the two players play one on one and let the other three players react to the play. Again, the drawings do not provide arrows for the off-ball defenders, because this will depend on your defensive philosophy.
Consider the following, one player is guarding the ball. The other player is off the ball, but in a position that they would be required to help the helper. This situation would require the off-ball defender to read whether the ball handler was getting beat or not. They would have to decide whether to help or not and then closeout to a player who might not be the first player they were defending.

